Proxmox is a Debian-based operating system for deploying and managing virtual machines using a web-interface. Its a great server environment to experiment with new operating systems or manage clusters of highly-available bitcoin and lightning nodes with nix-bitcoin.
What is nix-bitcoin?
nix-bitcoin is a collection of Nix packages and NixOS modules (written in the Nix programming language) for easily installing full-featured Bitcoin nodes on NixOS with an emphasis on security.
Learn more about nix-bitcoin’s security fund
What are Nix Packages?
Nix is a package manager. Its an alternative “app store” that you can install on any system (Windows, MacOS, and Linux)
Every package you install with Nix package manager is packaged using the Nix programming language.
What is Nix Programming Language?
Nix is a programming language. It is a purely functional, lazily evaluated, dynamically typed with a declarative syntax.
Software that is packaged or configured with Nix can achieve reproducible and verifiable builds.
The nix-bitcoin git repo has all the Nix code we need. We just have to download, configure and deploy it! However, you should probably be somewhat familiar with the Nix syntax. Check out this one-page overview of the Nix syntax.
What is NixOS?
NixOS is an operating system. It promises to “configure once, break never”.
NixOS was first released in June 2003. NixOS predates other popular distributions like Fedora (November 2003) and Ubuntu (October 2004).
Existing package and system configuration management tools suffer from an imperative model, where system administration actions such as package upgrades or changes to system configuration files are stateful: they destructively update the state of the system. This leads to many problems, such as the inability to roll back changes easily, to deploy multiple versions of a package side-by-side, to reproduce a configuration deterministically on another machine, or to reliably upgrade a system. […] we can overcome these problems by moving to a purely functional system configuration model. This means that all static parts of a system (such as software packages, configuration files and system startup scripts) are built by
pure functions and are immutable, stored in a way analogous to a heap in a purely functional language. We have implemented this model in NixOS, a non-trivial Linux distribution that uses the Nix package manager to build the entire system configuration from a modular, purely functional specification.Abstract from “NixOS: A purely functional Linux distribution“
Using NixOS as our base operating system, we can configure and deploy secure bitcoin and lightning nodes using nix-bitcoin.
Before we Begin…
In this guide, we will setup a new VM and install NixOS. Then we will deploy a bitcoin node on NixOS using nix-bitcoin.
After following this guide, you will be setup and ready to deploy additional bitcoin apps to your NixOS bitcoin node.
Here’s what we will cover:
- Step 1: Create NixOS VM in Proxmox
- Step 2: (Optional) Create a Virtual Hard Drive for your NixOS VM
- Step 3: (Optional) Create a partition and add a filesystem to your Hard Drive
- Step 4: Prepare NixOS for deployment
- Step 5: Prepare nix-bitcoin for deployment
- Step 6: Watch Bitcoin Download Blocks
- Step 7: Deploy all the things!
If you are new to Proxmox, I recommend this video tutorial for Installing Proxmox. Ready to dive deep into what’s possible with Proxmox? Check out this excellent video series on Proxmox.
Security Tip – Follow the Security Tips!
These orange blocks will explore ways to achieve more security with your deployment. They are optional, but good to practice!
Ok, let’s get started!
Step 1: Create NixOS VM in Proxmox
NixOS 24.05 is the latest version as I write this, so we will use NixOS 24.05, but feel free to use the latest version. https://nixos.org/download

Security Tip – Verify your ISO
Verify the SHA-256 hash$ sha256sum /path/to/your/nixos.iso
This command will output a sha-256 hash.
Compare this hash with the one published alongside the ISO you download.
Confirm that the hashes match before continuing!
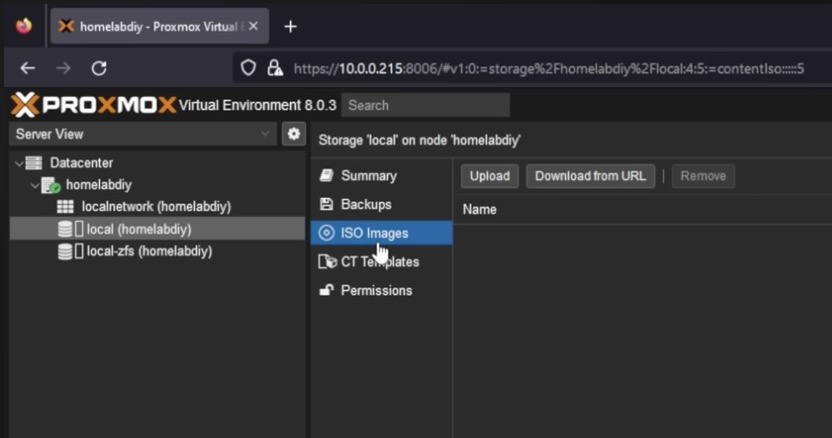
In your Proxmox dashboard, click on your server to expand it, then click the different storage pools. One of your storage pools should enable you to store ISO images.

Obtain an ISO for NixOS Graphical and “Download from URL” or you can “Upload” an ISO if you already downloaded it.
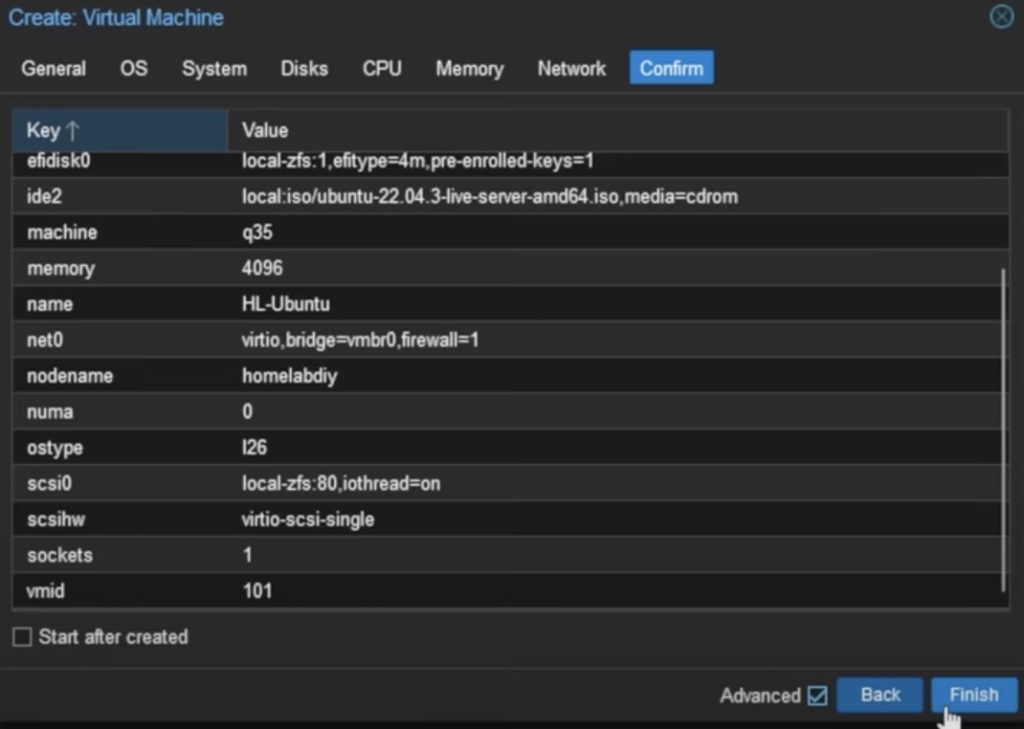
Next, click “Create VM” and follow the Wizard!

- On the “General” tab, just give your new VM a “Name“
- On the “OS” tab, select the NixOS Graphical ISO we downloaded earlier.
- On the “System” tab, all the defaults are fine, just click “Next“.
- On the “Disks” tab, set the size of the primary VM disk (128 GB or more should be fine)
- On the “CPU” tab, just increase the number of Cores to your liking. Four cores is a good start. You can edit this later.
- On the “Memory” tab, set the maximum MiB of RAM you want to give this VM. Choosing 4096 MiB (4GB) is a good start. You can edit this later.
- On the “Network” tab, just accept the defaults.
- Lastly, confirm your selection and create the VM!
NOTE: We set disk space to 128GB for our installation. In Step 2, we’ll be adding a second drive for blockchain storage. Choose a larger Disk Size here if you’re going to use your OS disk for block storage.

Your new VM should appear on the left-side pane under your Proxmox server’s name in the sidebar.
Go ahead and Start the VM and open the VM’s console. You should see the NixOS installation boot menu!

The screen may go black for a couple mins… just be patient.
You should eventually see the GNOME desktop with NixOS Installer GUI

Go ahead and follow the Wizard to set your preferred language, and other settings.
Use a strong password for root and user accounts. We will need that password later!

Make sure to choose “No Desktop”. The GUI is nice for helping us install NixOS, but we don’t want any desktop for our nix-bitcoin node!

We don’t need any unfree software to deploy nix-bitcoin.

Select the “Erase Disk” option. Make sure your 128GB disk is selected. No Swap needed because we have plenty of RAM for this system.
Security Tip – Encrypt your Boot Disk
Check “Encrypt System” and choose a strong encryption password to protect your boot disk from unauthorized access.
Go ahead and review the Summary and Install.

Don’t worry if it gets “stuck” at 46%. Just be patient…

You did it! NixOS is installed!

You can proceed to the next step!
Step 2: (Optional) Create a Virtual Hard Drive for your NixOS VM
Currently, our VM has two disks. It has the NixOS ISO, and the 128 GB disk with NixOS installed.
We’re going to remove that ISO and add a larger disk for the Bitcoin timechain data.
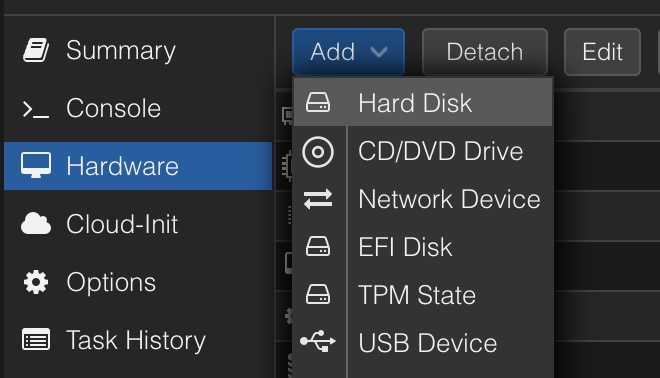
In Proxmox, select the Hardware tab of the VM. Then select the CD/DVD drive with the nixos.iso image. Then Remove the disk.


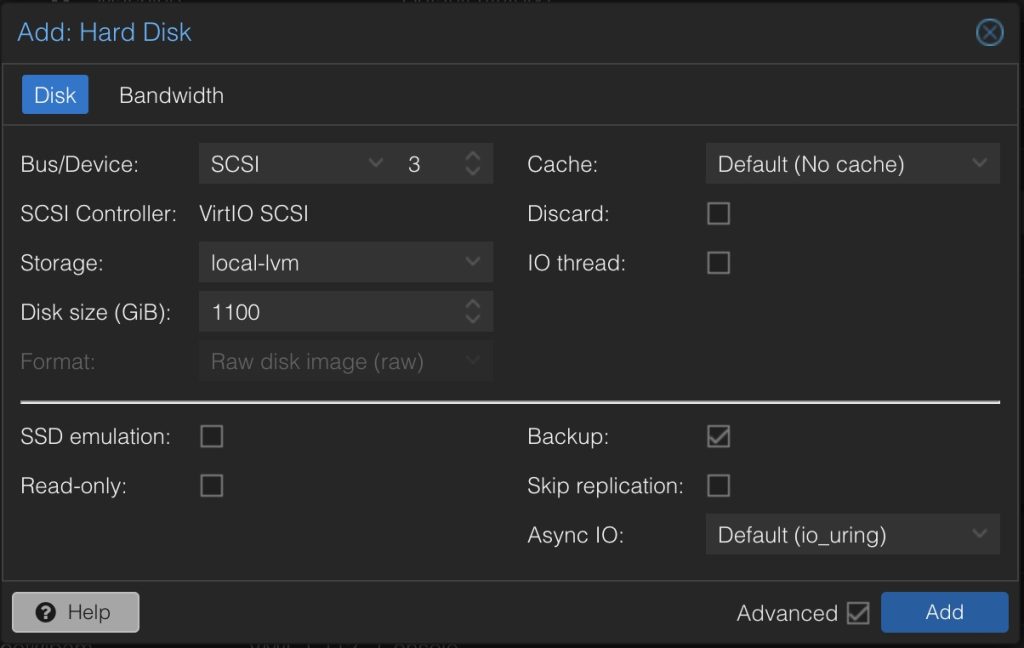
In Proxmox, select the Hardware tab of the VM. Then Add > Hard Disk.

Select the Storage pool to use, and input the Disk size GiB to use for bitcoin blocks, chainstate, and indexes. 1024 – 2048 GiB (1-2TB) should be sufficient for most setups.

Click “Add” to attach the virtual disk.

Use Proxmox to Reboot or Shutdown/restart the VM. This will apply the change which removes the ISO Drive. This time, the VM should boot into NixOS on command line.

Step 3: (Optional) Create a partition and add a filesystem to your Virtual Hard Drive
So far, we’ve installed NixOS and “attached” a virtual disk to the VM. However, we still need to partition, format, and mount the drive to our linux filesystem so that NixOS can use it to store data.
Open up a shell in the VM and log in as root.
Firstly, we need to identify the new disk’s label.
fdisk -l
The output of this command will look something like this:
Disk /dev/sda: 128 GiB, 34719476736 bytes, 4217728 sectors
Disk model: QEMU HARDDISK
Units: sectors of 1 * 512 = 512 bytes
Sector size (logical/physical): 512 bytes / 512 bytes
I/O size (minimum/optimal): 512 bytes / 512 bytes
Disklabel type: dos
Disk identifier: 0x91261eec

Device     Boot   Start       End   Sectors  Size Id Type
/dev/sda1          2046   1914879   1912834  934M  5 Extended
/dev/sda2  *    1914880 134217727 132302848 29.1G 83 Linux

Disk /dev/sdb: 1.1 TiB, 4294967296000 bytes, 8388608000 sectors
Disk model: QEMU HARDDISK
Units: sectors of 1 * 512 = 512 bytes
Sector size (logical/physical): 512 bytes / 512 bytes
I/O size (minimum/optimal): 512 bytes / 512 bytes
Disklabel type: gpt
Disk identifier: SKFJSA-F1A8-DE4D-93D2-1F43ED220CFFB
You can see there are two disks: /dev/sda (128 GB) and /dev/sdb (1.1 TB).
/dev/sda has 2 partitions:
- /dev/sda1
- /dev/sda2
/dev/sdb (the newly added disk) has no partitions yet.
Security Tip – Use Encrypted Partitions
Use LUKS encrypted volumes for additional drives you add to the VM. However, we’re not going to cover the steps to encrypt drives here.
Let’s use fdisk utility to create the primary partition:
$ fdisk /dev/sdb
This will start the fdisk utility. Any commands you type will be fdisk commands.
IMPORTANT: If your disk is larger than 2 TB, you need to run this command before creating a new partition.
g
The “g” command will apply the GPT (not chatgpt.) partition schema for modern BIOs that supports drives greater than 2TB.
Type “n” to create a new partition.
n
Follow the wizard to create Primary partition #1 for the new disk.
When you’re done, write the partition and exit fdisk with “w”:
w
Now, if you run fdisk -l, you will see that the disk has a partition.
We need to create a filesystem for this disk partition. That will allow us to later mount it to extend our NixOS filesystem with extra storage.
Use the mkfs command to create an ext4 filesystem on the /dev/sdb1 partition.
mkfs.ext4 /dev/sdb1
Great! The new disk has a partition with a compatible filesystem and is ready to mount to our NixOS.
Step 4: Download and Verify nix-bitcoin
We need to install wget on NixOS in order to download nix-bitcoin.
nano /etc/nixos/configuration.nix
Find these lines and uncomment wget:
environment.systemPackages = with pkgs; [
    wget
];
Save and quit nano with Ctrl+x, then press “Y” to confirm overwrite and Enter to save and exit.
Apply the configuration with:
nixos-rebuild switch
This will rebuild your entire OS using the modified configuration.
Now that we have wget, let’s get the latest release of nix-bitcoin from https://github.com/fort-nix/nix-bitcoin/releases
We’ll be downloading nix-bitcoin-0.0.111
cd /etc/nixos
mkdir nix-bitcoin
cd nix-bitcoin
wget https://github.com/fort-nix/nix-bitcoin/releases/download/v0.0.111/nix-bitcoin-0.0.111.tar.gz
Verify the file you just downloaded
sha256sum nix-bitcoin-0.0.111.tar.gz
Verify the output matches the SHA256SUMS.txt for that release
If the checksums match, you can continue by extracting the Tarball and replacing our configuration with nix-bitcoin’s example:
tar -xzvf nix-bitcoin-0.0.111.tar.gz
cp examples/configuration.nix ../
Step 5: Prepare nix-bitcoin for deployment
At this time, we’re ready to start editing the nix-bitcoin configuration.nix!
nano /etc/nixos/configuration.nix
Take a couple minutes and read this entire file!
Ok, you read everything right? Let’s continue!
Modify the imports in configuration.nix to look like this:
imports = [

# use the local nix-bitcoin modules we downloaded and verified
./nix-bitcoin/modules/presets/secure-node.nix

# we're going to disable the hardening for now
# <nix-bitcoin/modules/presets/hardened.nix>

# make sure to uncoment this line to include the /etc/nixos/hardware-configuration.nix that was generated when NixOS was installed
./hardware-configuration.nix
];
Security Tip – Don’t Disable the Hardened Kernel Profile
We are lazy and want to get nix-bitcoin running as fast as possible, so we are disabling this feature. Consider leaving it enabled, or even upgrading to the “hardened-extended” profile for a production deployment.
We are only going to enable bitcoind only to start. If you try to enable any other services, you will get errors because bitcoind won’t be fully synced.
Let’s disable clightning for now by commenting out this line:
# services.clightning.enable = true;
Bitcoin-core is enabled by default since we’re importing the “secure-node” preset from nix-bitcoin. However, we can customize our bitcoin.conf by uncommenting these lines and adding our config options.
services.bitcoind.extraConfig = ''
  # put your bitcoin-core configs here. For example...
  dbcache=4096 # this will help sync blocks faster
  # txindex=1 will NOT work here...
'';
If you want to build a txindex, add this line:
services.bitcoind.txindex = true;
Add this line to allow nix-bitcoin to generate all your node’s secrets (tor onions keys, RPC passwords, HMACs, etc.) These secrets will be saved to /etc/nix-bitcoin-secrets/ in NixOS.
nix-bitcoin.generateSecrets = true;
Security Tip – Use Network Isolation
By default, all services on the same OS will be able to access one another. nix-bitcoin allows us to leverage NixOS network isolation in order to put every service in it’s own virtual network and tightly control how services can communicate with one another.
Additionally, we want to add this line to configure a custom dataDir for bitcoin to use for block storage:
services.bitcoind.dataDir = "/mnt/bitcoin"; # choose where your additional drive is mounted
Ok, let’s finally mount that virtual hard drive we added earlier!
Add these lines towards the end of configuration.nix along with any other “custom options” you want to add.
fileSystems."/mnt/bitcoin" = {
    device = "/dev/sdb1";
    fsType = "ext4";
};
Now we’ll make this configuration bootable with:
boot.loader.grub = {
  enable = true;
  devices = [ "/dev/sda" ]; # use the disk with NixOS installed
};
Lastly, we’ll update the config version at the end of the file to match our release version:
# make sure this matches the release version of nix-bitcoin
nix-bitcoin.configVersion = "0.0.111";
Security Tip – Disallow Substitutes for NixOS
If you prefer to build the NixOS system from source instead of copying binaries from the Nix cache, add the following line to configuration.nixnix.extraOptions = "substitute = false";
Be aware it can take many hours to build packages from source.
Save and quit the editor when you’re done editing configuration.nix
We need to update our system’s channel for our version of NixOS 24.05:
nix-channel --update
Apply the new configuration:
nixos-rebuild switch
This will apply your new configuration. It will use nix-bitcoin’s module presets to install bitcoind with all your configured options enabled. It will generate secrets and place them in the /etc/nix-bitcoin-secrets/ directory.
If everything finished without any errors, you should have Bitcoin running on NixOS!
Step 6: Watch Bitcoin Download Blocks
Login to your NixOS machine and run this command to monitor the progress of bitcoind initial block download:
watch systemctl status bitcoind
Once the blocks are fully synced, (i.e. progress=1.000000) then you’re ready to deploy other apps!
Step 7: Deploy all the things!
Simply edit your configuration, read the comments to enable and configure Lightning, Liquid nodes, Mempool, RideTheLightning, and more!
Simply run nixos-rebuild switch to apply changes to the configuration.
To get a summary of the nix-bitcoin services running on NixOs:
nodeinfo
Troubleshooting
Read the nix-bitcoin documentation: https://github.com/fort-nix/nix-bitcoin
